Set up the Compute Engine MCP server
Google's Compute Engine MCP server lets AI agents manage VM instances (create, start, stop, reset, resize, delete) and inspect managed instance groups, instance templates, disks, snapshots, machine types, reservations, and commitments. This guide walks through enabling the Compute Engine API, granting IAM roles to users, creating an OAuth client in Google Cloud, and connecting the server to MintMCP.
Prerequisites
- A MintMCP admin account
- A Google Cloud project with billing enabled
Enable the Compute Engine API
- Go to console.cloud.google.com/apis/enableflow?apiid=compute.googleapis.com and select your project.
- On Confirm project, check that the correct project is selected and click Next.
- On Enable API, click Enable. Enabling the Compute Engine API also enables its MCP server.
Grant IAM roles
Each user who connects to Compute Engine through MintMCP needs IAM roles on the Google Cloud project.
- Go to console.cloud.google.com/iam-admin/iam and select your project.
- To add roles to a user already listed, click the edit (pencil) icon on their row. To add a new user, click Grant access and enter their email address or a Google Group.
- Add the roles, clicking + Add another role for each:
- MCP Tool User (
roles/mcp.toolUser) to make MCP tool calls - Compute Viewer (
roles/compute.viewer) to list and inspect Compute Engine resources - Compute Instance Admin (v1) (
roles/compute.instanceAdmin.v1), only for users who should create, modify, start, stop, or delete VM instances - Service Account User (
roles/iam.serviceAccountUser), also only for users who create VMs: new instances run as a service account, and creating one requires this role on that service account (or on the project)
- MCP Tool User (
- Click Save.
Users without a role for an operation get an authorization error when they call the matching tool, so you can keep most users on Compute Viewer and reserve the admin role for the few who manage instances.
Create an OAuth client
The OAuth client gives MintMCP a Client ID and secret to broker each user's Google sign-in. Create one Web application client and point its redirect URI at MintMCP's callback.
-
Go to console.cloud.google.com/auth/clients and select your project.
-
If prompted to configure the OAuth consent screen, set the user type to Internal (Google Workspace organizations only). This restricts access to users in your org and skips Google app verification, which is otherwise required for the Compute Engine scopes.
-
Click Create client.
-
Set Application type to Web application and give it a name (for example,
MintMCP OAuth).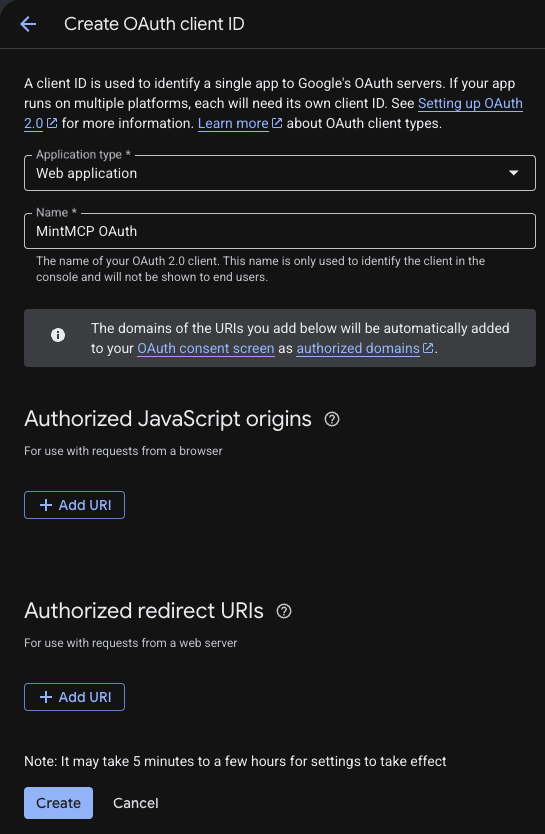
-
Under Authorized redirect URIs, click Add URI and enter:
https://app.mintmcp.com/oauth/callbackLeave Authorized JavaScript origins empty. This URI must match the Redirect URL in the connector's OAuth settings exactly, or sign-in fails with
redirect_uri_mismatch.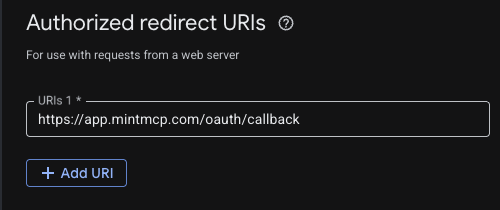
-
Click Create. Google shows the Client ID and Client secret once, so copy both now: you can't view the secret again after closing the dialog.
Reopen the client anytime from the Clients list to edit its redirect URIs or rotate the secret.
Add Compute Engine to MintMCP
- In MintMCP, go to MCP store → Manage store.
- Find Google Compute Engine in the recommended servers list and click Install.
- Open the connector's OAuth settings and enter the Client ID and Client secret from the OAuth client you created.
- Confirm the Redirect URL shown in the connector's OAuth settings matches the URI you added to the OAuth client (
https://app.mintmcp.com/oauth/callback). They must be identical, or sign-in fails withredirect_uri_mismatch. - Click Save.
The first time a user calls a tool, MintMCP directs them to sign in with Google and consent to the Compute Engine scope. MintMCP stores and refreshes their token automatically on every subsequent call.
Security considerations
- Access is controlled by Google Cloud IAM: users without the required roles receive an authorization error when connecting, and write tools require the Compute Instance Admin role on top of the read roles.
- Each user authenticates individually with their own Google account, so all operations run under their identity and appear in Cloud Audit Logs.
- The server exposes destructive tools (
delete_instance,stop_instance,reset_instance). Restrict them with the read-only scope, with tool customization in MintMCP, or with IAM deny policies, see Control MCP use with IAM. - Admin Activity audit logs are on by default for Compute Engine. Enable Data Access audit logs on the Compute Engine API to also capture read operations.
- The Compute Engine MCP server doesn't support full regional isolation and might route tool calls through any region.
Next steps
- Compute Engine MCP reference — Full list of tools and their descriptions
- Control MCP use with IAM — Restrict which tools users can call with deny policies
- Tool customization — Control which Compute Engine tools are exposed to users
- MCP gateway administration — Manage access and permissions