Set up the BILL Payable & Receivable MCP server
The BILL Payable & Receivable MCP server gives AI agents read access to accounts payable and accounts receivable: vendors and the bills they send you, the documents attached to those bills, customers and the invoices you send them, credit memos, and payment terms. This guide covers generating a developer key in BILL, installing the connector in MintMCP, and setting it up so each person signs in with their own BILL account.
Prerequisites
- A MintMCP admin account
- A BILL account with API access, and a user with the ADMIN role to generate the developer key
- Each person who will use the connector needs their own BILL sign-in
Bills and invoices are different records
BILL separates supplier documents from customer documents, and the naming catches people out:
| You want | BILL calls it | Tools |
|---|---|---|
| An invoice a supplier sent you, and what it cost | bill | list_bills, get_bill |
| An invoice you sent a customer, and what they owe | invoice | list_invoices, get_invoice |
Vendor invoices and costs are on the payable side. get_bill returns the itemized line items with their amounts, so an agent reads what was charged from structured data instead of downloading and opening the original document.
Generate a developer key
The developer key identifies your application to BILL and is shared by everyone using the connector. An organization can hold up to four.
-
Sign in to BILL at login.us.bill.com as a user with the ADMIN role.
-
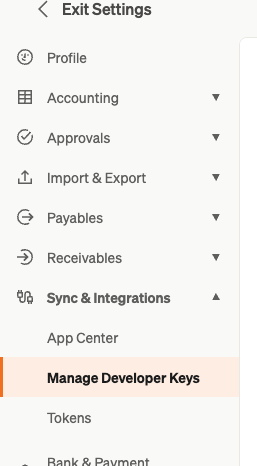
Open Settings, then go to Sync & Integrations > Manage Developer Keys.
-
Click Generate developer key and give it a name you will recognize later, for example
MintMCP.
-
Copy the key from the Developer key column. You enter it in MintMCP in the next step.
-
Note your organization ID, which begins with
008. It is the legal entity the connector queries by default.
BILL's keys and tokens guide has the full reference.
Add BILL Payable & Receivable to MintMCP
-
In MintMCP, go to MCP store > Manage store > Recommended servers.
-
Find BILL Payable & Receivable and click to install it.
-
Set the environment variables:
Variable Scope Description BILL_DEV_KEYGlobal The developer key from the previous step. Stored encrypted. BILL_ORGANIZATION_IDGlobal Default legal entity to query, beginning with 008.BILL_ENVIRONMENTGlobal production(default) queries live data. Set tosandboxfor BILL's test environment.BILL_USERNAMEPer-user Each person's own BILL email address. BILL_PASSWORDPer-user That person's BILL password. Stored encrypted. -
Click Install. Each person is prompted for their BILL username and password the first time they connect.
Scoping the sign-in per user is what makes authorization correct. BILL evaluates every call against that person's own permissions, so a connector user sees exactly the vendors and bills they would see in the BILL web app. Scoping those two variables globally instead means one service account's view is shared by everyone who can reach the connector, so choose that account deliberately if you go that way.
Available tools
All 23 tools are read-only and carry readOnlyHint, so clients can distinguish them from tools that change state. Nothing here creates a bill, schedules a payment, sends an invoice, or charges a customer.
| Area | Tools |
|---|---|
| Vendors | list_vendors, get_vendor, list_vendor_attachments |
| Bills | list_bills, get_bill, list_recurring_bills |
| Bill documents | list_bill_documents, get_bill_document |
| Vendor credits | list_vendor_credits, get_vendor_credit |
| Legal entities | list_organizations |
| Invoices | list_invoices, get_invoice, list_recurring_invoices, get_recurring_invoice |
| Customers | list_customers, get_customer, list_customer_contacts, get_customer_contact |
| Credits and terms | list_credit_memos, get_credit_memo, list_payment_terms, get_payment_term |
Security considerations
- With
BILL_USERNAMEandBILL_PASSWORDscoped per-user, every call is attributed to that person in BILL and governed by their permissions. Anything they cannot see in the BILL web app is not reachable through the connector. - Repeated failed sign-ins for the same BILL username are paused locally rather than forwarded, so a wrong password does not accumulate failed authentications against a live BILL account.
- Bills, invoices, vendors, and customers carry financial and personal data, including amounts, bank references, email addresses, and phone numbers. Treat the connector as a sensitive data source when granting access, and narrow it with tool customization.
- To revoke access for one person, change or disable their BILL account. To revoke access for everyone, regenerate the developer key in BILL and update
BILL_DEV_KEY.
Troubleshooting
BILL rejected the sign-in. BILL refused the username, password, organization ID, or developer key. Confirm the person can sign in at login.us.bill.com with the same credentials, and thatBILL_ENVIRONMENTmatches where those credentials live. Sandbox credentials do not authenticate against production.- Tools return a 401 saying the connector is not configured. One of the four credentials did not arrive. All of
BILL_DEV_KEY,BILL_USERNAME,BILL_PASSWORD, andBILL_ORGANIZATION_IDmust be present, and the organization ID must begin with008. - A user sees fewer records than a colleague. That is per-user authorization working. BILL is filtering to what that person can see; check their role and entity access in BILL.
- Searching a vendor by partial name returns nothing. BILL has no substring operator. Use
name:sw:"Acme", which matches from the start of the name. - A bill document link does not open.
downloadLinkrequires the BILL session header, so it is not usable directly from a browser. For the amounts charged,get_billreturns them without any download. - The Spend & Expense API is separate. BILL Spend & Expense uses a single company-scoped API token and has its own connector. A Spend & Expense token does not authenticate against payable and receivable, and these credentials do not authenticate against it.
Next steps
- Tool customization: control which BILL tools are exposed to users
- MCP gateway administration: manage access and permissions
- Set up the BILL Spend & Expense MCP server: the companion connector for card spend