Connect to services in a private network
Connect MintMCP to approved services inside your infrastructure, then validate the connection with a remote MCP server or hosted connector. You deploy an agent replica with Kubernetes or Docker; it initiates outbound connections, so you do not need an inbound firewall rule or public listener.
Private Networks are available on Enterprise plans. If Create Private Network is not visible, contact your Mint representative to enable access.
| Use case | Traffic path |
|---|---|
| Internal MCP server | MCP client → MintMCP policy gateway → available agent replica → internal MCP server |
| Hosted connector | MintMCP-hosted connector → private route → available agent replica → internal API or database |
Before you begin
Use the same MintMCP tenant throughout enrollment and operation:
| Tenant | Control-plane URL |
|---|---|
| United States | https://app.mintmcp.com |
| European Union | https://eu.mintmcp.com |
You need:
- Permission to manage Enterprise settings or all servers in your organization.
- Kubernetes with Helm 3 and
kubectl, or a Docker host. - Access to
ghcr.ioto download the chart and agent image. - Durable storage for each replica identity. The Helm chart requests a 1 GiB
ReadWriteOncevolume; Docker uses a named volume. - The following network access from each replica:
| Protocol | Destination | Purpose |
|---|---|---|
| Outbound HTTPS | Your MintMCP tenant | Enrollment, configuration, and heartbeat |
| Outbound UDP | Managed endpoint reported during enrollment and in agent logs | Encrypted private-network transport |
| DNS | Your DNS resolver | Resolve approved internal service names |
| Outbound TCP | Configured internal hostnames and ports | Application traffic |
Create one Private Network per environment or trust boundary, one route per internal service, and one replica for evaluation. For production, enroll at least two independent replicas.
MintMCP forwards only configured service routes. Kubernetes NetworkPolicy, container firewall rules, or equivalent controls can further restrict which destinations a replica can reach.
1. Create the network
- Go to Settings → Enterprise → Private networks.
- Select Create Private Network.
- Enter a name and an Environment key, such as
production,staging, oreu-production. The key is an operator-facing label, not a hostname or secret. - Select Create and provision, then wait for the network to become Ready. Open its details to inspect provisioning status or a reported failure.
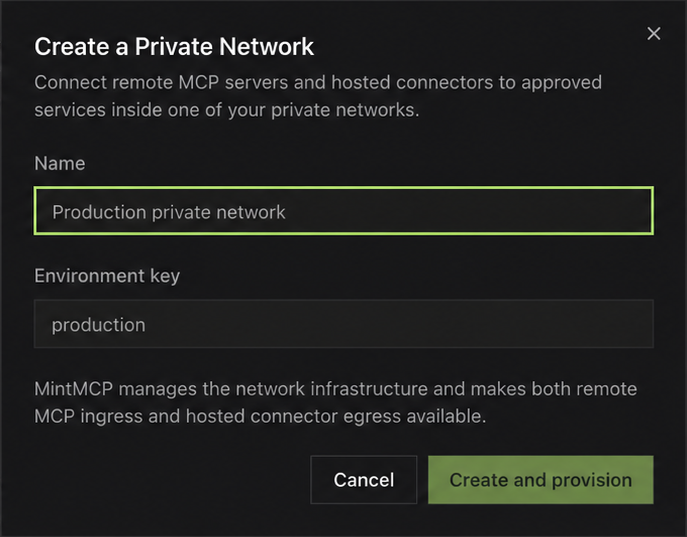
A Ready network has its managed infrastructure. It still needs a Ready connection replica and service routes before it can reach your services.
2. Install a connection replica
Open the network and select Set up connection. Give the replica a placement label, such as prod-us-east-1a or cluster-a-nodepool-2, then select Create enrollment.
The single-use enrollment token expires after 30 minutes. Choose one installation method below and use the chart or image version shown in MintMCP.
Kubernetes with Helm
Create the namespace and a temporary enrollment Secret. Replace the token placeholder with the token from MintMCP:
kubectl create namespace mintmcp \
  --dry-run=client --output=yaml | kubectl apply --filename=-

kubectl --namespace mintmcp create secret generic \
  mintmcp-private-network-agent-enrollment \
  --from-literal=enrollment-token='<token from MintMCP>'
Create values.yaml. For an EU tenant, use https://eu.mintmcp.com:
agent:
  controlPlaneUrl: https://app.mintmcp.com
  existingSecret:
    name: mintmcp-private-network-agent-enrollment
Install the chart, replacing <chart version shown in MintMCP>:
helm upgrade --install mintmcp-private-network-agent \
  oci://ghcr.io/mintmcp/charts/mintmcp-private-network-agent \
  --version '<chart version shown in MintMCP>' \
  --namespace mintmcp --create-namespace \
  --values values.yaml --wait --timeout 5m
The init container exchanges the token for a durable identity on the persistent volume. The long-running agent uses that identity and does not receive the enrollment token.
Docker
Create a named volume for this replica's identity:
docker volume create mintmcp-private-network-agent-state
Enroll once. Replace the token and image version placeholders. For an EU tenant, use https://eu.mintmcp.com in both Docker commands:
docker run --rm \
  --mount source=mintmcp-private-network-agent-state,target=/var/lib/mintmcp-private-network-agent \
  --env MINTMCP_PRIVATE_NETWORK_CONTROL_PLANE_URL=https://app.mintmcp.com \
  --env MINTMCP_PRIVATE_NETWORK_ENROLLMENT_TOKEN='<token from MintMCP>' \
  'ghcr.io/mintmcp/mintmcp-private-network-agent:<image version shown in MintMCP>' enroll
Start the replica using the same volume and image version:
docker run --detach \
  --name mintmcp-private-network-agent \
  --restart unless-stopped \
  --publish 127.0.0.1:8080:8080 \
  --mount source=mintmcp-private-network-agent-state,target=/var/lib/mintmcp-private-network-agent \
  --env MINTMCP_PRIVATE_NETWORK_CONTROL_PLANE_URL=https://app.mintmcp.com \
  'ghcr.io/mintmcp/mintmcp-private-network-agent:<image version shown in MintMCP>' run
The published image requires HTTPS for the control-plane URL. Port 8080 is bound only to the Docker host's loopback interface for local health checks.
Each additional replica needs a separate enrollment, container name, named volume, and loopback health port. Do not copy or share an enrolled identity volume.
3. Verify the connection
For Kubernetes, check the workload, persistent volume, and agent logs:
kubectl --namespace mintmcp get deployment,pod,pvc
kubectl --namespace mintmcp rollout status \
  deployment/mintmcp-private-network-agent
kubectl --namespace mintmcp logs \
  deployment/mintmcp-private-network-agent \
  --container agent --tail=200
For Docker, check the container and local health endpoints:
docker ps --filter name=mintmcp-private-network-agent
docker logs --tail 200 mintmcp-private-network-agent
curl --fail http://127.0.0.1:8080/livez
curl --fail http://127.0.0.1:8080/readyz
Then open the network in MintMCP and confirm that the replica is Ready, its runtime is Connected, its heartbeat is recent, and it has acknowledged the current configuration.
After a Kubernetes replica is Ready, remove the temporary Secret:
kubectl --namespace mintmcp delete secret \
  mintmcp-private-network-agent-enrollment
Restarts and upgrades reuse the identity on the persistent volume or Docker named volume. Keep that volume while the replica is active; revoke and replace the replica if its identity must change.
4. Add service routes
In the network details, select Add route. Each route approves one internal hostname and port, resolved and reached from inside your replica's network.
| Field | What to enter |
|---|---|
| Name | A readable service name for operators and hosted connector code |
| Target host | The internal DNS name or IP address visible from the replica |
| Port | The service's listening port |
| Remote MCP connectors | Enable for an MCP server accessed through MintMCP |
| Originate TLS to the target | Enable for an HTTPS remote MCP target |
| Private CA certificate bundle (optional) | Paste your CA bundle here if the remote MCP target uses a private CA |
| Hosted connectors | Enable when MintMCP-hosted code needs raw TCP access to the service |
Select Add route, then wait for Ready. A route waits for a replica until a Ready replica receives and acknowledges its configuration.
For example, an HTTPS MCP server at https://mcp.internal.example/mcp needs target host mcp.internal.example, port 443, Remote MCP connectors, and Originate TLS to the target enabled. Its certificate must match the target hostname, including when you provide a private CA bundle.
5. Attach connectors and test traffic
Remote MCP server
- Create or edit the remote MCP connector and enter its internal URL, including the normal path, such as
https://mcp.internal.example/mcp. - Under Network path, choose Private Network.
- Select the Ready route from the network/route list. The URL's origin (scheme, host, and port) must match the route's displayed target origin.
- Refresh the manifest, confirm that tools appear, and run a read-only tool call.
MintMCP uses the private route for server-side MCP traffic and supported OAuth discovery and token exchange. Requests sent through the selected route must use its approved origin. Configure the connector's authentication as usual.
Hosted connector
Choose the Private Network when creating the hosted connector. This network selection cannot be changed after creation.
MintMCP supplies connection details for enabled Hosted connectors routes in the MINTMCP_PRIVATE_NETWORK_ROUTES_JSON environment variable:
[
  {
    "id": "pnrte_example",
    "name": "Orders API",
    "host": "private-route-hostname",
    "port": 20000
  }
]
| Field | Meaning |
|---|---|
id | Stable route identifier for configuration |
name | Readable route name |
host | Private hostname supplied by MintMCP |
port | Private route port supplied by MintMCP |
Read the supplied values rather than hardcoding the example hostname or port. For an internal HTTP API, connector code can find a route by name:
const routes = JSON.parse(
  process.env.MINTMCP_PRIVATE_NETWORK_ROUTES_JSON ?? '[]'
);
const orders = routes.find((route) => route.name === 'Orders API');
if (orders == undefined) throw new Error('Orders API route is unavailable');

const response = await fetch(`http://${orders.host}:${orders.port}/health`);
if (!response.ok) throw new Error(`Orders API returned ${response.status}`);
For databases or other TCP services, pass the supplied host and port to your client library. Hosted routes carry raw TCP; connector code remains responsible for service credentials, database authentication, and TLS. Test each configured service before directing production traffic to it.
Add redundancy and validate failover
For production, enroll at least two independent replicas and place them on separate nodes or availability zones where practical.
- Select Add replica in MintMCP for each new installation.
- Give each replica its own enrollment, identity volume, and Helm release or Docker container. For Helm, use distinct release and enrollment Secret names, and a separate values file for each release.
- Run one pod per Helm release. Do not scale a release above one pod or run multiple containers against one enrolled identity volume.
Validate failover:
- Confirm both replicas are Ready, with Connected runtimes and current configuration.
- Run a baseline remote MCP tool call or hosted-route request.
- Stop one replica and wait for MintMCP to mark it unavailable.
- Run a new request and confirm it succeeds through the remaining replica. Existing TCP connections do not move between replicas.
- Restore the stopped replica and wait for Ready.
Each replica accepts up to 256 simultaneous forwarded connections by default. Add replicas for sustained capacity before raising this limit.
Upgrade one replica at a time
For Helm, replace the release name and version with the replica and chart version you intend to upgrade:
helm upgrade mintmcp-private-network-agent \
  oci://ghcr.io/mintmcp/charts/mintmcp-private-network-agent \
  --version '<new chart version>' --namespace mintmcp \
  --reuse-values --wait --timeout 5m
The chart replaces the pod while retaining its PVC-backed identity. Wait for that replica to return to Ready before upgrading the next release. For Docker, stop and replace one container at a time with the new image while retaining its named volume.
DNS, TLS, and security
- The agent uses the pod or container's DNS configuration. Cluster service names and private DNS zones must be resolvable from that location. The chart supports
hostAliaseswhen a hostname needs a local address override. - For remote MCP routes, Originate TLS to the target enables HTTPS with certificate verification. Supply a private CA bundle when needed, and ensure the target hostname matches the certificate's subject alternative name.
- Hosted connector routes carry raw TCP. Configure TLS and application authentication in the connector's client library.
- The agent image runs as a non-root user. The Helm chart also uses a read-only root filesystem and drops all Linux capabilities. The agent does not require
NET_ADMIN, host networking, or a host TUN device. - Every replica has its own identity and credential. Revoke a replica in MintMCP when retiring it, then remove its workload and persistent storage.
Troubleshooting
| Symptom | Check |
|---|---|
| Enrollment fails | The token has not expired or been used; the control-plane URL matches your tenant; the Secret key is enrollment-token; the identity volume is writable |
| Workload runs but the replica is not Ready | Agent logs, outbound HTTPS and UDP, the managed endpoint, network policy, and configuration acknowledgement |
| Route waits for a replica | At least one replica is Ready and has acknowledged the latest configuration |
| Remote MCP returns 404 | The selected route is Ready, the URL origin matches its target origin, and the URL includes the correct MCP path |
| TLS verification fails | The target hostname matches the certificate SAN and the private CA bundle is complete and current |
| Hosted route is missing | Hosted connectors is enabled on the route and the connector was created in that Private Network |
| Internal hostname does not resolve | The pod or container can reach the required DNS resolver and resolve the name from its own network |
Remove a network
- Move or remove the remote MCP and hosted connectors that depend on the network.
- Delete the service routes after their consumers have moved.
- Revoke each connection replica in MintMCP, then uninstall its Helm release or remove its Docker container.
- Delete its PVC or named volume after revocation, when the identity is no longer needed.
- Delete the Private Network. MintMCP blocks deletion while dependencies remain.
Validate before production use
- The network, required routes, and at least two production replicas are Ready.
- Remote MCP tool calls and each hosted service have been tested.
- A one-replica failure test succeeds and the stopped replica returns to Ready.
- Each replica has its own release or container and identity volume; temporary enrollment Secrets are deleted.
- Your team has reviewed route destinations, exposures, TLS settings, and the required HTTPS, UDP, DNS, and TCP access.
For help with the first deployment, contact your Mint representative or enterprise@mintmcp.com.