Deploying Teradata MCP Server
The Teradata MCP server enables AI applications to query Teradata databases through a governed, auditable interface. By deploying it on MintMCP's hosted infrastructure, you centralize database credentials, enforce access controls, and maintain comprehensive audit logs of all database operations.
Prerequisites
- Access to a Teradata database instance
- Database credentials (username, password, and host URL)
- MintMCP account with hosted server permissions
When to Use Teradata MCP Server
Deploy the Teradata MCP server when you need to:
- Provide AI assistants with read access to Teradata data warehouses
- Centralize Teradata credentials rather than distributing them to individual users
- Audit all queries executed against Teradata databases
- Control which users or teams can query specific Teradata instances
- Enable natural language queries against enterprise data in Teradata
Deployment Steps
1. Navigate to MCP Connectors
Go to MCP Connectors in the MintMCP console and click Add Connector.
2. Select Hosted Server with Advanced Configuration
Click the Hosted Server tab, then select Advanced from the dropdown to access custom container configuration.
3. Configure the Command Tab
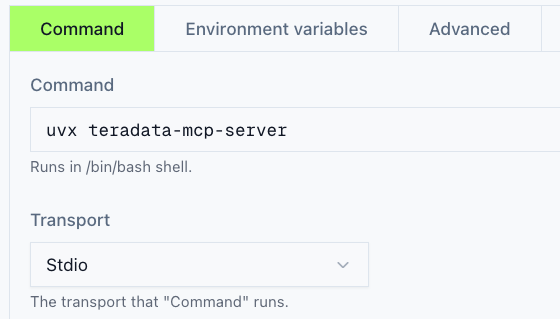
Command
Enter the following in the command field:
uvx teradata-mcp-server
Transport
Leave the Transport dropdown set to Stdio.
4. Configure the Environment Variables Tab
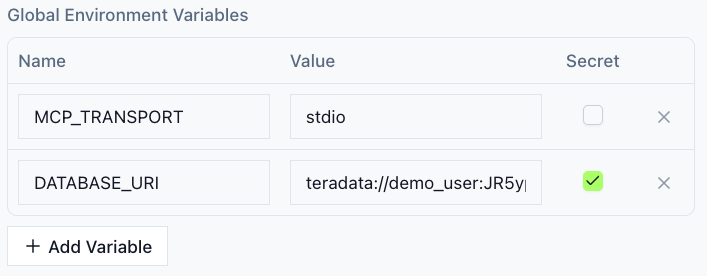
DATABASE_URI
teradata://{USER}:{PASSWORD}@{HOST_URL}:1025/{USER}
Replace the placeholders:
{USER}: Your Teradata database username{PASSWORD}: Your Teradata database password{HOST_URL}: Your Teradata host URL
MCP_TRANSPORT
stdio
5. Configure the Advanced Tab
Click the Advanced tab and configure the container image:
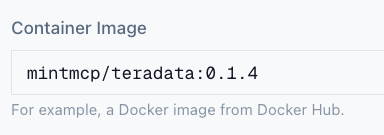
Container Image
mintmcp/teradata:0.1.4
You can select a different version based on your requirements. See available versions at Docker Hub: mintmcp/teradata.
6. Save and Deploy
Click Save to deploy the connector. MintMCP will:
- Pull the specified container image
- Start the Teradata MCP server with your configuration
- Perform health checks to verify the server is running
- Report deployment status on the connector detail page
Monitor the connector logs for any startup issues. Common problems include incorrect database URIs, invalid credentials, or network connectivity issues between MintMCP and your Teradata instance.
Adding to Virtual MCP Servers
After deployment, add the Teradata connector to one or more Virtual MCP servers to control access:
- Navigate to Virtual MCP Servers in the MintMCP console
- Select an existing VMCP or create a new one
- Add the Teradata connector to the VMCP's connector list
- Configure access controls to specify which users or groups can use the Teradata tools
Users will see the Teradata MCP server's tools (such as query_database) in their AI applications once they connect to the Virtual MCP URL.
Tool Customization
Use VMCP Tool Customization to:
- Rename tools to match your organization's terminology
- Add descriptions or examples for database schema
- Hide advanced tools that most users don't need
- Set default parameters for common query patterns
Next Steps
- Share the Virtual MCP URL with your team following the User Guide
- Configure Agent Monitor Rules to control what data can be queried
- Review Data Retention and Permissions for compliance requirements
- Explore other MCP Connectors to expand capabilities