Building Docker Images for Hosted Servers
MintMCP's hosted server environment can run MCP servers from custom Docker images. This guide shows you how to build a Docker image that includes the dependencies required by MintMCP's runtime, using the Snowflake MCP server as an example.
Prerequisites
- Docker installed locally
- Docker Hub account for publishing images
- An MCP server you want to containerize (we'll use Snowflake MCP as an example)
- For the Snowflake example: A Snowflake account with key-pair authentication configured. Generate a private key with a password following the Snowflake documentation.
Required Dependencies for MintMCP's Environment
All Docker images deployed to MintMCP's hosted environment must include these packages:
- nodejs and npm - MintMCP's orchestration layer uses these for authentication and coordination
- python3 - Required by MintMCP's runtime
- bash - Used for startup scripts
- curl - Used for health checks
These must be present even if your MCP server doesn't directly use them.
Building a Docker Image: Snowflake Example
This example uses the Snowflake Labs MCP server as a starting point and builds a MintMCP-compatible image.
1. Set up the project
mkdir snowflake-mcp && cd snowflake-mcp
git init
git submodule add https://github.com/Snowflake-Labs/mcp.git upstream
git submodule update --init --recursive
2. Create a Dockerfile
Use the original Snowflake MCP Dockerfile and add the MintMCP-required packages to the dependency installation section:
# Install packages required by MintMCP's hosted environment
RUN apt-get update && apt-get install -y \
    curl \
    nodejs \
    npm \
    bash \
    && rm -rf /var/lib/apt/lists/*
3. Build the image locally
docker build \
  --platform linux/amd64 \
  -f Dockerfile \
  -t your-dockerhub-username/snowflake-mcp:1.0.0 \
  ./upstream
4. Test the image locally
Place your rsa_key.p8 private key file in the current directory, then run:
docker run --rm \
  -p 9000:9000 \
  -e SNOWFLAKE_ACCOUNT={ACCOUNT_NAME} \
  -e SNOWFLAKE_USER={USER_NAME} \
  -e SNOWFLAKE_PRIVATE_KEY_FILE=/mnt/rsa_key.p8 \
  -e SNOWFLAKE_PRIVATE_KEY_FILE_PWD={PRIVATE_KEY_PASSWORD} \
  -v "$(pwd)/rsa_key.p8:/mnt/rsa_key.p8" \
  -v "$(pwd)/upstream/services/configuration.yaml:/app/services/tools_config.yaml:ro" \
  your-dockerhub-username/snowflake-mcp:1.0.0
The -v flags mount your private key and configuration file into the container. Verify the server starts successfully by connecting with the MCP Inspector:
npx @modelcontextprotocol/inspector http://localhost:9000/snowflake-mcp
5. Push to Docker Hub
docker login
docker push your-dockerhub-username/snowflake-mcp:1.0.0
After pushing, retrieve the image digest (SHA256 hash) for pinning:
docker inspect --format='{{index .RepoDigests 0}}' your-dockerhub-username/snowflake-mcp:1.0.0
The output will look like: your-dockerhub-username/snowflake-mcp@sha256:abc123...
Deploying the Image in MintMCP
Once your image is published to Docker Hub, configure it as a hosted connector:
1. Navigate to MCP Connectors
Go to MCP Connectors and click Add Connector.
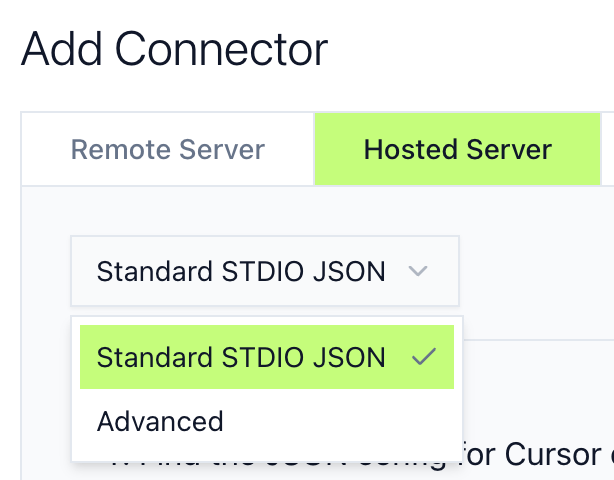
2. Select Hosted Server and Advanced
Click the Hosted Server tab, then select Advanced from the dropdown.

3. Configure the MCP server
Command
Specify the command that starts the MCP server:
mcp-server-snowflake --service-config-file /app/services/configuration.yaml --transport stdio
Container Files
Zip your private key file and upload it using the Container Files field. MintMCP will unpack the zip file and mount its contents to /mnt. For example, if you zip rsa_key.p8, it will be available at /mnt/rsa_key.p8 in the container.
zip keys.zip rsa_key.p8
Transport
Select stdio for stdio-based servers or http for HTTP streamable servers.
Environment Variables
Add any environment variables required by the MCP server. For example, Snowflake servers need:
SNOWFLAKE_ACCOUNT: Your Snowflake account identifierSNOWFLAKE_USER: Your Snowflake usernameSNOWFLAKE_PRIVATE_KEY_FILE: Path to the private key file (/mnt/rsa_key.p8)SNOWFLAKE_PRIVATE_KEY_FILE_PWD: Password for the private key
Set variable scope to "Global" for organization-wide values or "Per-User" to prompt each user for their own credentials.
Container Image
Enter your image reference. Pin to a specific digest for security and reproducibility:

your-dockerhub-username/snowflake-mcp@sha256:abc123def456...
See Docker's documentation on image digests for how to retrieve the SHA256 hash of your published image.
4. Save and Deploy
MintMCP pulls the image, starts the container, and performs health checks. Monitor the connector detail page for logs and status updates.
Troubleshooting
Getting an older cached image instead of the latest version
MintMCP caches Docker images. If you reference your image using a mutable tag like latest, MintMCP may serve the cached version even after you've pushed a newer image. To ensure you get the exact image version you want, use the SHA digest instead:
# Recommended: References the exact image by digest
mintmcp/snowflake@sha256:0d3857c02c91ce5f4081778319c43c41c5098a6a20235ae08e2e0564cbbfac7d

# Avoid: May serve a cached version
mintmcp/snowflake:latest
Next Steps
- Add the hosted connector to a Virtual MCP server to control access
- Use VMCP Tool Customization to configure which tools are exposed
- Review Hosted Connectors for standard deployment options
- See MCP Connector Security for security and compliance considerations